Tuesday, October 9, 2012

Apple Cobbler


With this past year's wonky weather we were lucky to squeeze in an apple picking trip before this year's short season ended. Apple Cobbler

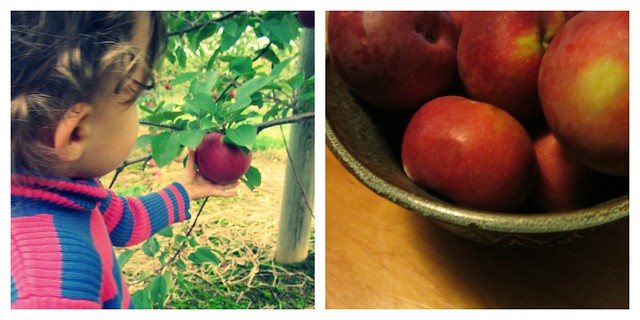
Now, with all of these delicious apples on hand it was time to add the beautiful smell of them baking into the house.  Max and I had different opinions about which form our baked apples would take.  He wanted pie and I wanted crisp (because I'm lazy and was so not into rolling out dough) so we compromised and settled on Cobbler.  The best of both worlds!

Apple Filling:

8 (or so) medium apples
1/2 cup Apple Cider
1/4 cup Flour
1/2 cup Sugar
1 tsp Cinnamon
1/8 tsp Nutmeg
3 Tb Butter

Cobbler Topping:

1 1/3 cup Flour
2 Tb Sugar
1 1/2 tsp. Baking Powder
1/2 tsp. Salt
5 Tb Butter, cold and unsalted
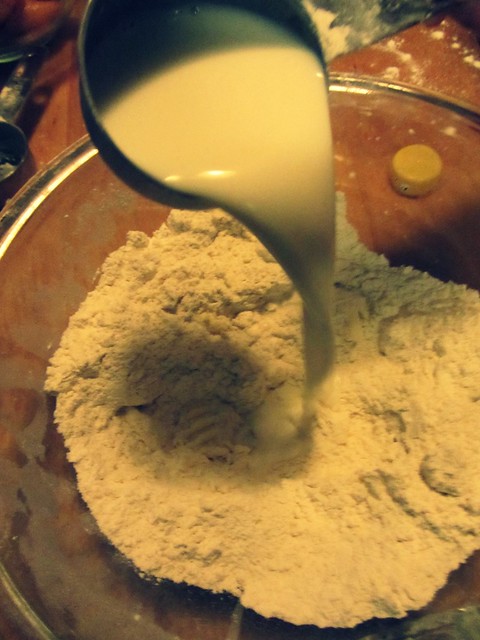
1/2 cup Milk


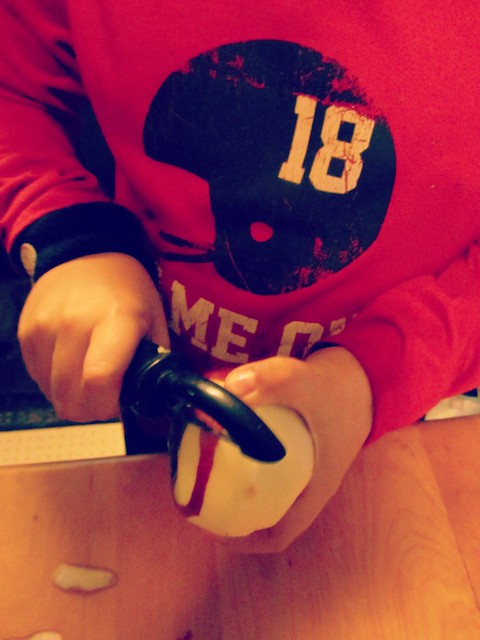
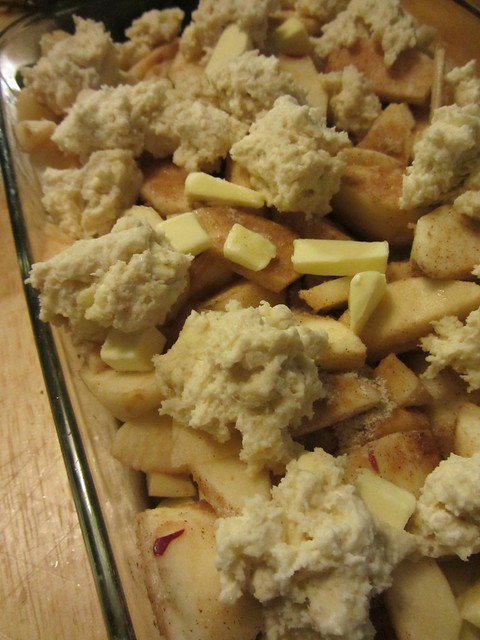
1.  Preheat oven to 375 degrees.  Wash and peel your apples.  Slice them up and put into an unbuttered 9 x 12 " baking dish and pour apple cider over the top.

apple cobbler2

2. Mix together flour, sugar, cinnamon and nutmeg (use apple filling measurements) and sprinkle over the top of the apples.  Stir gently to distribute evenly.

3. Cut up 3 Tb of butter and lay over the top of the apples.

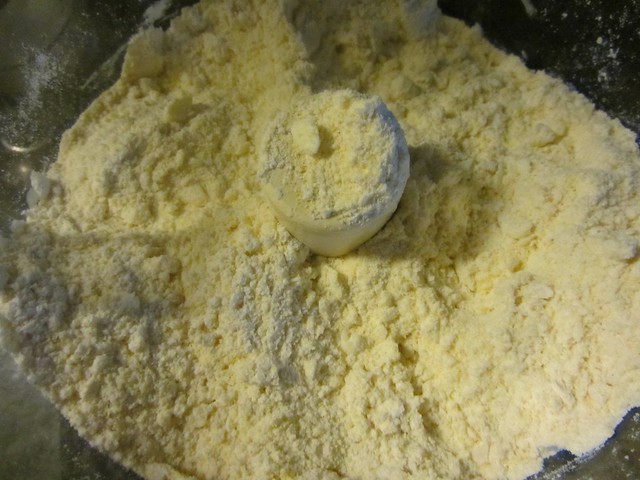
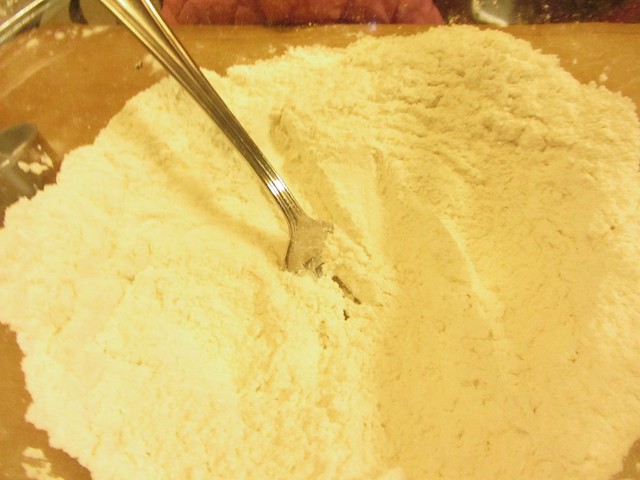
4. For the cobbler topping, use the same bowl that you mixed the apple filling flour mixture in.  Add the flour, sugar and baking powder (using the cobbler measurements) and give a quick mix.

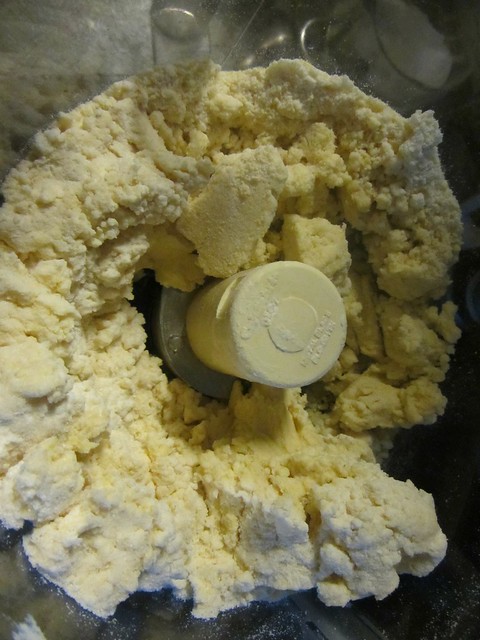
5. Cut up the 5 Tb of butter very small and cut butter into the flour mixture. 

    (This can be done with two knives, a pastry cutter or my preferred method is to take a fork and my fingers and quickly break up the butter into the flour until you have pea sized pebbles of butter evenly distributed through the flour.)

apple cobbler4

6. Add milk and stir about 10 times until just incorporated. 

apple cobbler5

7.  This is where you can take some creative freedom:  You can, using a lightly floured surface, roll out the dough and cut whatever shapes you'd like to cover the top of the cobbler or you can drop the biscuits freestyle over the top.  You can also do an egg or milk wash and sprinkle with sugar for added pizazz.

As this was a family collaborative dessert and I wasn't about to add any unnecessary steps, we chose to go rustic this time and drop them over the top.

apple cobbler6

8.  Bake for 50 minutes until browned and delicious!

apple cobbler7

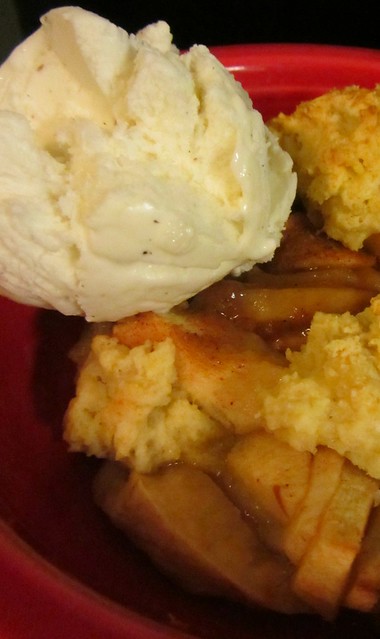
Top with some vanilla ice cream and enjoy!

apple cobbler8

Monday, October 8, 2012

Messy Day Fun: Corn Starch Goo

After a week of rain, a general feeling of restlessness was felt all over the house. I needed to find something to lift our spirits.  In our house nothing lifts our spirits like getting really messy! It is something that an almost nine year old and an almost two year old have fun doing together and for us that is really important.  


  messy day 007

If you want to measure and use this messy fun as a science experiment, I suggest you check out this site!  We have done the lesson part before, today we just wanted to have fun!  Mad Scientist kind of fun!!

So, with this particular activity no measurements are required! 
messy day 010 messy day 013

I am going to take a moment to suggest that you wear some clothes you don't mind getting messy and highly suggest you do this activity outside.  .  It washes easily out of anything it touches but it covers everything if you are doing it right!

corn starch collage

You want to pour enough water into the cornstarch until it starts to feel like tough goo.  One way to know you have the right consistency is to grab a glob and squeeze.  It will turn hard as a rock in your closed hand but will turn to soft goo again when you open it.  We also like to make a ball and throw them on the ground where they will instantly lose their shape and ooze into a blob.

cornstarch hands

With a seven year age gap, I get near giddy to see my kids both having fun doing the same thing!


messy day 042


Don't worry about your kids eating any either...cornstarch and water...totally edible!
messy day 067


Goo turned into paint with more water being added and our walkway got a make over!
messy day 089


Baths, showers and a hose rinse for the walkway and all was back to normal!  If you find your family getting a little restless in the future why not try a little messy fun!  Sometimes it's just what's needed.  

Thursday, September 27, 2012

Fennel Garlic Roasted Chicken and Potatoes

I love the combination of fennel and garlic and a slow roasted chicken.   Just typing it now is making me want to go to the fridge and pull out the left overs.  Just yummy!  This is a very easy one pot roasted chicken recipe that doesn't take a lot of hands on time but comes out tasting like it did!!

PicMonkey Collage chicken 3

Ingredients
5lb Chicken
5-6 thin skin potatoes
1 onion
3 Tb Fennel Seeds
3 cloves Garlic
1 Tb + 1 tsp Salt
1/4 cup Olive Oil
 
Equipment:
 
Heavy Cast Iron Pot:  I have a very loved Le Crueset that I use but any heavy oven safe pot will do (no teflon coated).  If you don't have one you can use a baking dish. 
Mortar and Pestle:  One of my new favorite kitchen gadgets of yore.  I'm sure not all of you have one of these (why would you?).  If not just chop up garlic and mix with garlic, salt and oil.  When adding the fennel seed to the mixture run between fingers to break open the seeds a big.  Mix all together.
 
Cutting Board/ Sheet Pan:  This is my favorite set up for cutting up a roasted chicken or any other cut of meat that is sure to send fatty liquid onto my counter.  I know a lot of people suggest using a cutting board with a well but those inevitably overflow.  Just get a sheet pan put a few paper towels onto it and then a cutting board that fits into the sheet pan on top.  Voila!  Clean counter!!
Sharp Knife: For obvious reasons!
 
Directions
 
1. Preheat oven to 425 degrees and pull out chicken.  Remove giblets and pat dry. ( No rinsing the chicken, read about that here).


2. Slice up onions and spread onto the bottom of pan or dish. Quarter potatoes and spread on top of onions. PicMonkey Collage chicken 2

 
3. Using the mortar and pestle crush garlic and salt into a paste. Add seeds and and crush just to release aroma. Add oil to create a paste. (if not using a mortar and pestle see the equipment not above)


Where the Wild Things Are 006 chicken


4. Spread paste liberally all over the outside and inside of chicken. Tie the legs together (don't worry about getting fancy and put on top of the potatoes in the pot. Cook at 425 degrees for 1 1/2 to 2 hours with out a lid until the internal temperature reaches 165 degrees in the breast and 175 degrees in the thigh or until the juices run clear when pricked.

PicMonkey Collage chicken

5. Set up carving board set up. (See equipment for set up) and pull chicken out to rest on the cutting board for 15 minutes.

  Where the Wild Things Are 049

6. Give potatoes and onions a good stir to coat in fennel and garlic chicken fat. Remove with a slotted spoon to serving platter, taste and sprinkle with salt if needed.

Where the Wild Things Are 047

7. Slice up chicken and serve with the potatoes and a simple greens salad topped with your favorite vinaigrette. 

PicMonkey Collage chicken 3

Don't forget to save the carcass to make the best Chicken Stock ever!!

Thursday, September 20, 2012

Roasted Vegetable and Brown Rice Soup

Though this soup is not most visually alluring soup, it is so,so tasty.  The roasted vegetables bring a depth and flavor concentration that make it hard to remember there isn't any meat in there!

soup 029

Oh..and it's easy too!


Ingredients:

2 quarts of Chicken Stock
2 medium Broccoli Crowns
2 small Zucchini
2 Carrots
10 Mushrooms
1 Onion
1 clove Garlic, chopped
3 Tb Sesame Oil
2 Tb Tamari
3/4 cup dried brown rice

Ingredient Explanation:  Store bought chicken or vegetable stock are good substitutes for the real thing.  Make sure you get stock though and not broth.  Tamari is a wheat free soy sauce substitute.  Soy sauce works great here too. 

Directions:

1. Preheat oven to 400 degrees.

2. Chop the broccoli, zucchini, carrots, mushrooms and onion in your favorite soup eating shape.  I prefer a medium chop. 
soup 021

2. Drizzle a bit of sesame oil on the sheet pan and add your chopped vegetables all mixed together.  Add chopped garlic and top with a bit of sesame oil and a drizzle of tamari. 

3. Put the vegetables into the oven for 40 minutes and while those are roasting, bring chicken stock to a boil in a pot big enough to hold the stock, rice and vegetables.

4. Once stock is boiling add brown rice and turn down to medium low.

5.  After 20 minutes stir the vegetables.  At 40 minutes the veggies will be ready to add to the stock.  They may look a little past done but that is when they are perfect!
soup 024

6. Cook for 20 more minutes to bring the flavors together and to get the rice to the appropriate consistency and then you are done!  Enjoy!

soup 026

Tuesday, September 18, 2012

Roasted Brussel Sprouts

The cool nights have started descending upon us and the Brussels sprout stalks are full of yummy delicious sprouts.  Below please find my absolute favorite way to eat Brussels sprouts!  Super easy and very delicious, sure to sway even the pickiest of eaters. 

quiche 019


Preheat Oven to 375 degrees

Remove any less than desirable outer leaves of the Brussels sprouts
Cut off ends and then cut in half.  (Be sure to leave those outer leaves that separate.  Those are the best part!  Brussels Sprout chips!)
Lay on sheet pan drizzled in olive oil. 
Sprinkle with salt then another drizzle of oil.

Cook for 40 minutes until properly browned.  Flip at least once during this time. 

Once out of the oven, quickly and lightly drizzle with Apple Cider Vinegar. 

Enjoy!

quiche 029

Saturday, September 15, 2012

Harvest Quiche

With a hearty cornmeal crust to hold up the bounty of summer vegetables that are loaded into this quiche, this is a meal unto itself.   Full of the end of the summer garden goodies, you can't miss with this sure to please dish.


quiche 065
1 1/2 hours before you want to eat

Cornmeal Pie Crust
(makes 2)

1 1/2 cups Flour
3/4 cup Cornmeal
2 sticks Butter (1 cup)
1/3 cup ice cold water, plus two tablespoons
1 1/2 tsp Salt


1. Combine Flour, Cornmeal in Salt in a food processor.

2.  Cut up butter into little chunks and put into the food processor.  Pulse until the butter looks like little pebbles.
quiche 008quiche 009

3. Add water while machine is running just until mixture starts to come together a little bit.  It will still be quite shaggy.

quiche 010

4. Separate into two mounds and press together into a disc.  Wrap in plastic wrap and put into the fridge for a 1/2 hour, mixture will come together during this time.      If making ahead of time, this is the stage you would stop at. 

quiche 011


(Drop down and start preparing the quiche filling if making all at once.  )

5. Once all the filling is prepared, roll out and put into an ungreased 9"- 10" pie dish or tart pan. 

Both the crust and the filling vegetables can be made up to a day ahead of time if you prefer.  If you choose to do this let both sit at room temperature for 20 minutes before attempting to roll out and fill the quiche. 

Harvest Quiche Filling
(enough for two pies)

1 lb of Bacon (Optional but oh so good!)
1 medium Onion, chopped
1 medium Zucchini, chopped
1 ear of Corn, (leftover Grilled Corn works great!)
1 cup of shredded Cheddar Cheese
4-5 Plum Tomatoes, sliced
1 Tb Olive Oil
3 tsp Salt
8 Eggs
2 cups milk
1/8 tsp nutmeg


1. Fry up bacon until crispy then drain over paper towels.  This can be done with whatever your favorite method is.  Chop when cool enough to handle.

2. While bacon is frying.  In another pan, heat olive oil over medium heat, after 2 minutes add chopped onion and 1 tsp of salt and saute for 5 minutes.  After that time, add chopped zucchini and continue sauteing for 15 more minutes.  Stirring occasionally.  (Some brown is o.k. but if getting too dark take off the heat for a minute and turn down the burner)

3. Cut corn off the cob, break up into individual kernels.  Take note to remove any of the silk that stays behind.  Preheat oven to 350 degrees.

4. After dough is in pie pan, split the bacon, cheese, corn, onion and zucchini mixture and sliced tomatoes evenly between the two  pie shells.

4. Whisk together eggs, milk, 2 tsp of salt and nutmeg.  Pour over the two filled pie shells.

5. Bake at 350 degrees for 30 minutes.  Turn up to 400 degrees and cook 10 more minutes until golden brown. 

6. Let sit for 10 minutes, slice and enjoy!

quiche 050
(This picture is of the more kid friendly bacon, cheese and corn.  Feel free to customize!)

This will keep up to two days in the refrigerator and heats up beautifully at 350 degrees for 10 minutes


quiche 065 Go the extra mile and top with a  smoky and fresh chipolte corn salsa!

Grilled Corn and Chipolte Salsa

 A delicious end of the summer treat that works great as a dip on its own but is also hearty enough to stand up to accompany beef or chicken.  Experiment with your favorite way to use this great taste of summer. 


quiche 045

Grilled Corn and Chipolte Salsa

2 Ears of Grilled Corn
1/2 cup chopped Garden tomatoes
1/4 cup chopped Cilantro
1 Chipolte in Adobo Sauce
1 Tb of Adobo Sauce
1 Tb of Apple Cider Vinegar
1 tsp of Salt

Ingredient Explanation:  Chipolte in adobo is found in a small can.  Usually in the Mexican section of your grocery story.  For this recipe you will need to get one whole chipolte out and 1 Tb of the sauce.  Refridgerate the rest of the can in a plastic container and will stay for weeks. 

1. Slice corn off of the cob and separate into individual kernels.  Make sure to remove any stray silk that makes its way into the bowl.

quiche 021

2. Add tomatoes, cilantro, chipolte, adobo sauce, apple cider vinegar and salt.

quiche 025

3. Stir to combine and let sit for 15 minutes before serving.

In addition to being a great topping to beef or chicken, one of my favorite accompaniments is the Harvest Quiche!