Thursday, September 27, 2012

Fennel Garlic Roasted Chicken and Potatoes

I love the combination of fennel and garlic and a slow roasted chicken.   Just typing it now is making me want to go to the fridge and pull out the left overs.  Just yummy!  This is a very easy one pot roasted chicken recipe that doesn't take a lot of hands on time but comes out tasting like it did!!

PicMonkey Collage chicken 3

Ingredients
5lb Chicken
5-6 thin skin potatoes
1 onion
3 Tb Fennel Seeds
3 cloves Garlic
1 Tb + 1 tsp Salt
1/4 cup Olive Oil
 
Equipment:
 
Heavy Cast Iron Pot:  I have a very loved Le Crueset that I use but any heavy oven safe pot will do (no teflon coated).  If you don't have one you can use a baking dish. 
Mortar and Pestle:  One of my new favorite kitchen gadgets of yore.  I'm sure not all of you have one of these (why would you?).  If not just chop up garlic and mix with garlic, salt and oil.  When adding the fennel seed to the mixture run between fingers to break open the seeds a big.  Mix all together.
 
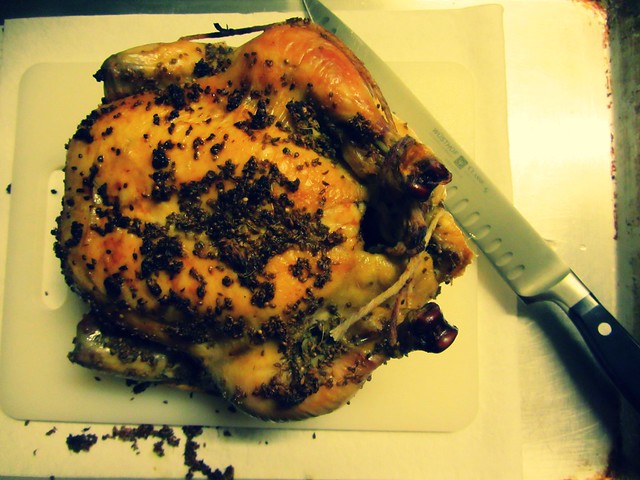
Cutting Board/ Sheet Pan:  This is my favorite set up for cutting up a roasted chicken or any other cut of meat that is sure to send fatty liquid onto my counter.  I know a lot of people suggest using a cutting board with a well but those inevitably overflow.  Just get a sheet pan put a few paper towels onto it and then a cutting board that fits into the sheet pan on top.  Voila!  Clean counter!!
Sharp Knife: For obvious reasons!
 
Directions
 
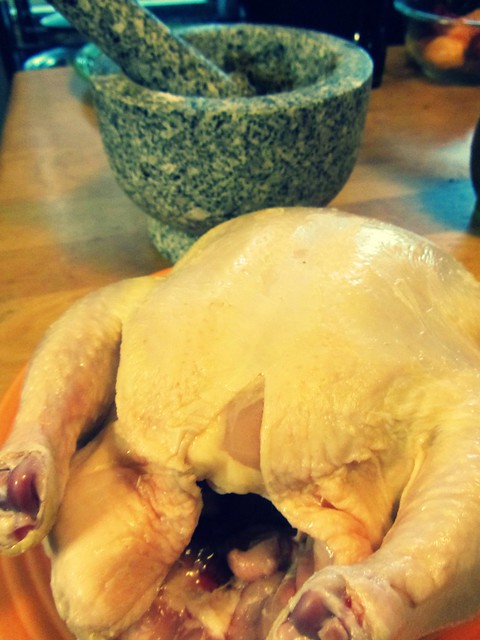
1. Preheat oven to 425 degrees and pull out chicken.  Remove giblets and pat dry. ( No rinsing the chicken, read about that here).


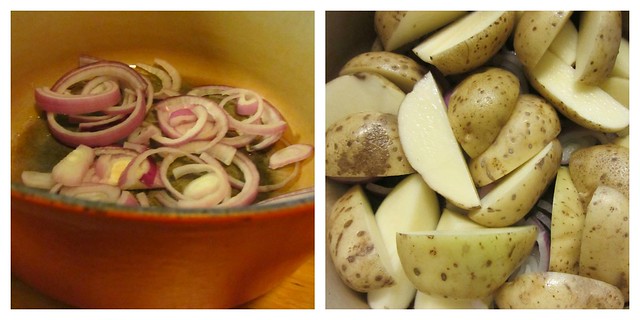
2. Slice up onions and spread onto the bottom of pan or dish. Quarter potatoes and spread on top of onions. PicMonkey Collage chicken 2

 
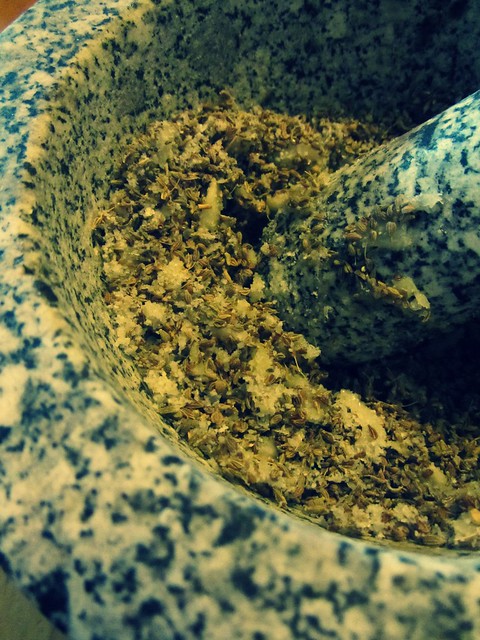
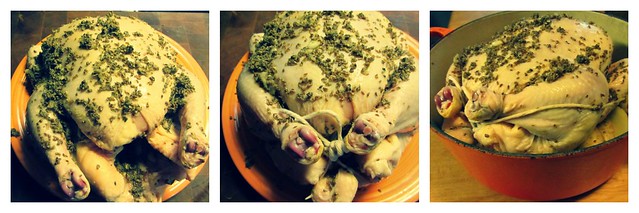
3. Using the mortar and pestle crush garlic and salt into a paste. Add seeds and and crush just to release aroma. Add oil to create a paste. (if not using a mortar and pestle see the equipment not above)


Where the Wild Things Are 006 chicken


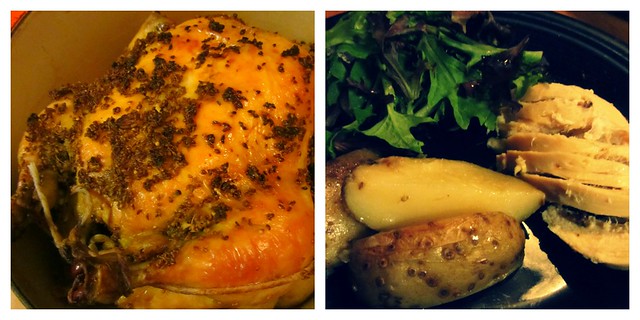
4. Spread paste liberally all over the outside and inside of chicken. Tie the legs together (don't worry about getting fancy and put on top of the potatoes in the pot. Cook at 425 degrees for 1 1/2 to 2 hours with out a lid until the internal temperature reaches 165 degrees in the breast and 175 degrees in the thigh or until the juices run clear when pricked.

PicMonkey Collage chicken

5. Set up carving board set up. (See equipment for set up) and pull chicken out to rest on the cutting board for 15 minutes.

  Where the Wild Things Are 049

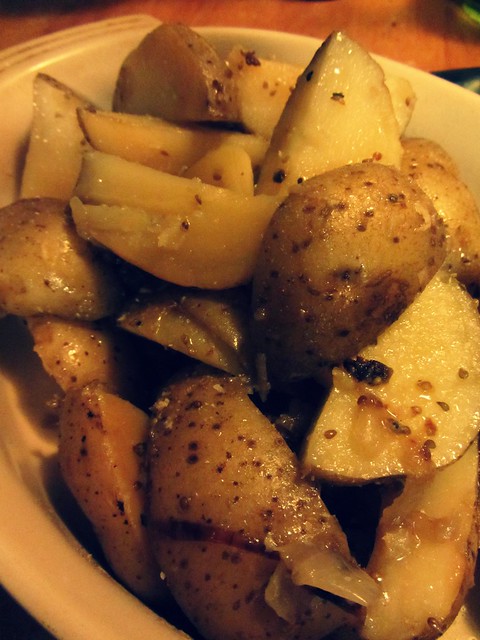
6. Give potatoes and onions a good stir to coat in fennel and garlic chicken fat. Remove with a slotted spoon to serving platter, taste and sprinkle with salt if needed.

Where the Wild Things Are 047

7. Slice up chicken and serve with the potatoes and a simple greens salad topped with your favorite vinaigrette. 

PicMonkey Collage chicken 3

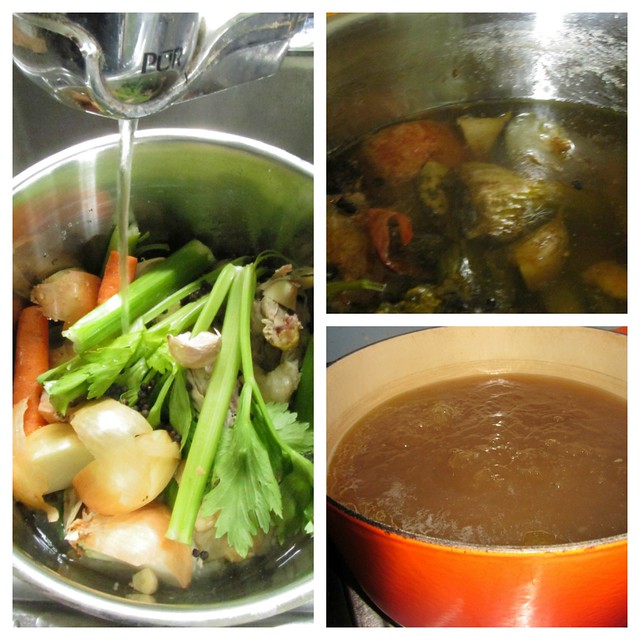
Don't forget to save the carcass to make the best Chicken Stock ever!!

Thursday, September 20, 2012

Roasted Vegetable and Brown Rice Soup

Though this soup is not most visually alluring soup, it is so,so tasty.  The roasted vegetables bring a depth and flavor concentration that make it hard to remember there isn't any meat in there!

soup 029

Oh..and it's easy too!


Ingredients:

2 quarts of Chicken Stock
2 medium Broccoli Crowns
2 small Zucchini
2 Carrots
10 Mushrooms
1 Onion
1 clove Garlic, chopped
3 Tb Sesame Oil
2 Tb Tamari
3/4 cup dried brown rice

Ingredient Explanation:  Store bought chicken or vegetable stock are good substitutes for the real thing.  Make sure you get stock though and not broth.  Tamari is a wheat free soy sauce substitute.  Soy sauce works great here too. 

Directions:

1. Preheat oven to 400 degrees.

2. Chop the broccoli, zucchini, carrots, mushrooms and onion in your favorite soup eating shape.  I prefer a medium chop. 
soup 021

2. Drizzle a bit of sesame oil on the sheet pan and add your chopped vegetables all mixed together.  Add chopped garlic and top with a bit of sesame oil and a drizzle of tamari. 

3. Put the vegetables into the oven for 40 minutes and while those are roasting, bring chicken stock to a boil in a pot big enough to hold the stock, rice and vegetables.

4. Once stock is boiling add brown rice and turn down to medium low.

5.  After 20 minutes stir the vegetables.  At 40 minutes the veggies will be ready to add to the stock.  They may look a little past done but that is when they are perfect!
soup 024

6. Cook for 20 more minutes to bring the flavors together and to get the rice to the appropriate consistency and then you are done!  Enjoy!

soup 026

Tuesday, September 18, 2012

Roasted Brussel Sprouts

The cool nights have started descending upon us and the Brussels sprout stalks are full of yummy delicious sprouts.  Below please find my absolute favorite way to eat Brussels sprouts!  Super easy and very delicious, sure to sway even the pickiest of eaters. 

quiche 019


Preheat Oven to 375 degrees

Remove any less than desirable outer leaves of the Brussels sprouts
Cut off ends and then cut in half.  (Be sure to leave those outer leaves that separate.  Those are the best part!  Brussels Sprout chips!)
Lay on sheet pan drizzled in olive oil. 
Sprinkle with salt then another drizzle of oil.

Cook for 40 minutes until properly browned.  Flip at least once during this time. 

Once out of the oven, quickly and lightly drizzle with Apple Cider Vinegar. 

Enjoy!

quiche 029

Saturday, September 15, 2012

Harvest Quiche

With a hearty cornmeal crust to hold up the bounty of summer vegetables that are loaded into this quiche, this is a meal unto itself.   Full of the end of the summer garden goodies, you can't miss with this sure to please dish.


quiche 065
1 1/2 hours before you want to eat

Cornmeal Pie Crust
(makes 2)

1 1/2 cups Flour
3/4 cup Cornmeal
2 sticks Butter (1 cup)
1/3 cup ice cold water, plus two tablespoons
1 1/2 tsp Salt


1. Combine Flour, Cornmeal in Salt in a food processor.

2.  Cut up butter into little chunks and put into the food processor.  Pulse until the butter looks like little pebbles.
quiche 008quiche 009

3. Add water while machine is running just until mixture starts to come together a little bit.  It will still be quite shaggy.

quiche 010

4. Separate into two mounds and press together into a disc.  Wrap in plastic wrap and put into the fridge for a 1/2 hour, mixture will come together during this time.      If making ahead of time, this is the stage you would stop at. 

quiche 011


(Drop down and start preparing the quiche filling if making all at once.  )

5. Once all the filling is prepared, roll out and put into an ungreased 9"- 10" pie dish or tart pan. 

Both the crust and the filling vegetables can be made up to a day ahead of time if you prefer.  If you choose to do this let both sit at room temperature for 20 minutes before attempting to roll out and fill the quiche. 

Harvest Quiche Filling
(enough for two pies)

1 lb of Bacon (Optional but oh so good!)
1 medium Onion, chopped
1 medium Zucchini, chopped
1 ear of Corn, (leftover Grilled Corn works great!)
1 cup of shredded Cheddar Cheese
4-5 Plum Tomatoes, sliced
1 Tb Olive Oil
3 tsp Salt
8 Eggs
2 cups milk
1/8 tsp nutmeg


1. Fry up bacon until crispy then drain over paper towels.  This can be done with whatever your favorite method is.  Chop when cool enough to handle.

2. While bacon is frying.  In another pan, heat olive oil over medium heat, after 2 minutes add chopped onion and 1 tsp of salt and saute for 5 minutes.  After that time, add chopped zucchini and continue sauteing for 15 more minutes.  Stirring occasionally.  (Some brown is o.k. but if getting too dark take off the heat for a minute and turn down the burner)

3. Cut corn off the cob, break up into individual kernels.  Take note to remove any of the silk that stays behind.  Preheat oven to 350 degrees.

4. After dough is in pie pan, split the bacon, cheese, corn, onion and zucchini mixture and sliced tomatoes evenly between the two  pie shells.

4. Whisk together eggs, milk, 2 tsp of salt and nutmeg.  Pour over the two filled pie shells.

5. Bake at 350 degrees for 30 minutes.  Turn up to 400 degrees and cook 10 more minutes until golden brown. 

6. Let sit for 10 minutes, slice and enjoy!

quiche 050
(This picture is of the more kid friendly bacon, cheese and corn.  Feel free to customize!)

This will keep up to two days in the refrigerator and heats up beautifully at 350 degrees for 10 minutes


quiche 065 Go the extra mile and top with a  smoky and fresh chipolte corn salsa!

Grilled Corn and Chipolte Salsa

 A delicious end of the summer treat that works great as a dip on its own but is also hearty enough to stand up to accompany beef or chicken.  Experiment with your favorite way to use this great taste of summer. 


quiche 045

Grilled Corn and Chipolte Salsa

2 Ears of Grilled Corn
1/2 cup chopped Garden tomatoes
1/4 cup chopped Cilantro
1 Chipolte in Adobo Sauce
1 Tb of Adobo Sauce
1 Tb of Apple Cider Vinegar
1 tsp of Salt

Ingredient Explanation:  Chipolte in adobo is found in a small can.  Usually in the Mexican section of your grocery story.  For this recipe you will need to get one whole chipolte out and 1 Tb of the sauce.  Refridgerate the rest of the can in a plastic container and will stay for weeks. 

1. Slice corn off of the cob and separate into individual kernels.  Make sure to remove any stray silk that makes its way into the bowl.

quiche 021

2. Add tomatoes, cilantro, chipolte, adobo sauce, apple cider vinegar and salt.

quiche 025

3. Stir to combine and let sit for 15 minutes before serving.

In addition to being a great topping to beef or chicken, one of my favorite accompaniments is the Harvest Quiche!

Thursday, September 13, 2012

Grilled Corn

Grilling corn is my favorite way to prepare this end of the summer favorite.  It makes not so sweet corn, sweeter and it makes sweet corn spectacular.

corn5


And it's sooooooo easy!

1. Get your awesome local corn.
corn3

2. Pull back husk and remove as much of the silk as you can.

3. Try to put back husk.  It won't go back like before but do the best you can.

4. Load onto the grill. Turn after 15 minutes.

corn4

corn1

5. Turn periodically throughout the next 15 minutes. 

(Husks will burn a little.  Just pick up with tongs, blow out and move them around.  Usually it is only the very dry parts at the end. )

They look pretty gnarly by the end, not to worry.  They are delish corn packages waiting to be eaten.
corn2


Let sit for a few minutes and peel back the husks carefully. 


corn5


Topping ideas:
Good ole butter and salt
Compound butters (cilantro, basil, garlic etc.)
Ranch dressing and bacon crumbles
Chipolte Mayo and Cotija cheese (dry Mexican cheese) with a squeeze of lime
Salsa
Roasted Garlic smear
The options are endless.......

What are your favorite corn toppings?

Monday, September 10, 2012

Falafel Salad

My favorite way to use up leftover falafel  An easy nutricious and delicious salad!

September 2012 080

Ingredients:

1 cup of Left Over Falafel, crumbled
1 cup of Steamed Broccoli, chopped
1/2 cup Grapes
1/4 cup Sliced Almonds
1/4 cup of Tahini Dressing

Ingredient Explanation:

Fresh broccoli steamed a little al dente works best and 1/4 cup of tahini dressing  is what works for me, go slow and add as much as suits you. 

Directions:

Put in a bowl and mix it up.  This should probably be two servings but I usually house the whole thing!  It's delicious!

Tahini Dressing

This is a favorite dressing if you are in the mood for falafel or just want something different.


This is an easy one to throw together at anytime.  The general rule is:

Equal parts Tahini (sesame paste) to cold water
For every 1/4 cup of tahini add 1 Tb. fresh squeezed lemon juice and 1 tsp. salt

For example:

1/4 cup Tahini
1/4 cup Cold Water
1 Tb Lemon Juice
1 tsp. Salt

Whisk together and let sit for a few minutes so that it will thicken a bit and meld the flavors. 

Enjoy!

Falafel

September 2012 040


Falafel Recipe Ingredients

14 oz Dried Chick Peas
1/2 cup Italian Parsley
1 small onion
3 cloves Garlic
2 Tb Cumin
1/2 tsp Coriander Seed
3 tsp Salt
2 Tb Flour

Favorite vegetable oil except for peanut or olive.  I use Grape seed oil most often.

Ingredient Explanation:  I have tried all different brands and kinds of chickpeas and all work in this recipe but hands down the best ever were the dried organic chickpeas from the Health Food Store in town.  They are smaller than any chickpea I have ever seen but there is something special about them.  The falafel is fluffier and lighter than the others. 

Italian parsley is the flat leaf parsley, not the curly variety that graced every plate in the 80's

Fresh coriander seed that you crush (mortar and pestle or other type of grinder) is best but if you only have ground then use 3/4 teaspoon.

Directions

The night before:


1. Rinse chick peas and check for rocks and debris to remove.  Put into a bowl and cover with boiling water to let soak over night.    They are fine on the counter.


1 hour before you want to eat:

2. Drain and rinse chick peas and put entire amount into a food processor.

3. Rough chop onions, parsley and garlic and put into food processor too.  Add baking soda, cumin, crushed coriander seeds and salt and turn on until smooth.  Periodically stopping to scrape down the sides.

September 2012 028September 2012 031

4. Remove to a bowl and add flour and manually stir in.   (you know...with a spoon!)   Let the mixture sit for 15 minutes. 

September 2012 032

5. In that time fill a heavy skillet. (I use a 10 inch cast iron pan) with a 1/2 inch of oil and turn onto medium.  (I throw a little tester falafel in to test that the oil is hot enough.) 

6. Once oil is hot, make patties that are formed but loosely and put them into the oil.  Let cook 4-5 minutes then flip.

7. 4-5 minutes on the other side then remove with a slotted spoon or spatula to a paper towel lined plate to drain. 

September 2012 037

8.  You can eat them right then or wait and heat them in the oven at 350 degrees until ready.  The reheat great up three days after making. 

Now What:

Serve in a pita pocket with some lettuce and tahini dressing.

One way to introduce kids to the world of falafel is to dress it like a burger with ketchup and mustard. It's one of Max's favorite that way!

I love to use the leftovers in the very delicious Falafel Salad. 

Friday, September 7, 2012

Rich Chicken Stock

PicMonkey Collage stock

The ultimate comfort, aromatherapy feel good food.  Chicken stock is not only good for chicken soup (although it rocks there too!), use it when cooking rice, polenta or your favorite grain.  It makes everything taste better!

So simple Directions:

Put into a pot (at least 5 quarts):

Roasted Chicken Carcass
Several Stocks of Celery
Several Carrots cut in half
Several Onions
Couple Cloves of Garlic
3 Bay Leaves
Bunch of Peppercorns
1 Tb. Apple Cider Vinegar

Cover with water and bring to a boil.

Ingredient Explanation:  You may have noticed the vagueness of my measurements.  That is because chicken stock is vague by definition.  What you have on hand gets thrown into a pot and miraculous, amazing broth emerges.  Though do note that there is not need to cut off the leaves or the skins of your vegetables, wash them and rough chop them into several pieces and you're good! 

Also note, making sure you have roasted your chicken and picked it of the majority of the meat is wildly important.  To amp up the flavor after you have thoroughly picked your chicken throw it into the oven at 350 degrees for an hour before you throw it into the pot.

Once stock comes to a boil reduce to a slow simmer and let roll for 4 hours or so.   (On my electric stove I bring it down to 3)

Strain the liquid out and put strained stock back on the stove to simmer for another 2 hours. 

This step isn't entirely necessary but makes the stock so full and delicious you won't want to skip it, plus I find that I need to add less salt if I do this step as all the flavors concentrate.  Once the stock is cool enough to taste, here is where you will add salt for the first time.  Add sparingly.  You can always add more as you cook with the stock but you can't take it away. 


Voila!  Amazing stock.  You can use this right then or let it cool and put it into the refrigerator overnight.  The next day skim off the fat and use. 


(Note:  If you have made this stock properly it will set up in the refrigerator like Jello.  This is not fat it is collagen and it is the yummy goodness.  The fat is usually white or yellow and is on the very top. )  

Tuesday, September 4, 2012

Garden Salsa

Stock and Salsa 060 Salsa Fresca, Pico Di Gallo...this fresh salsa can go by many names.  All you need to know is that is delicious and simple and can be used for many applications.  From fish to dip, this salsa brings the flavors of summer to your house.   

Garden Salsa Ingredients


1 cup of chopped Garden Tomatoes
1/2 medium chopped red onion
1/4 cup cilantro, chopped
1 small jalapeno, chopped
1 tsp. salt
1 Tb white vinegar
Juice from half of a lime


   Notes on the ingredients:

1. Garden tomatoes are best but if you find ripe (flavorful) store tomatoes then those are fine too.
2. You can use any onions.  I just like the color (and flavor) of the red onion in this application.
3. Cilantro and jalapeno can be used to your liking. I obviously like both a lot.  
4. Remember to taste jalapeno before putting it in to see how hot it is.  If quite hot then remove the ribs and seeds.  If not so hot,  add the jalapeno seeds and all but remember that the vinegar will bring out more heat. 


Directions

1.  Add all of the ingredients to a bowl, stir, serve and enjoy. 

I usually just enjoy this with a bag of some tortilla chips but would be great to finish off some grilled chicken, fish or pork.